

AI is fast at sketching an icon but its raw SVG output usually lands off-grid, with inconsistent strokes and tangled paths that are awkward to fix. This tutorial shows how to have AI draw a 24x24 copy icon directly inside IconVectors through its MCP server, then retouch and export it as a clean, maintainable asset.
IconVectors runs a local MCP server, so a compatible AI client on Windows or macOS connects to the running editor and creates real document elements instead of detached SVG text. Because the icon exists in the live document from the start, every standard tool, panel, and the undo stack work on it immediately.
Before you begin
- Set up the MCP connection first: Codex CLI, Claude, VS Code Copilot, or Cursor.
- If you want another end-to-end MCP example before this one, see Create an Info Icon with Codex CLI.
- For crisp small-size rendering, also read Stop Blurry Icons: Pixel-Perfect SVG Setup.
- If you already know you need a minified delivery asset, keep Minify and Optimize SVG Icons nearby.
Step 1 - Generate the icon with AI through MCP
Start IconVectors.exe, confirm your AI host can see the MCP server, then ask it to create the icon directly in the running document. Because the drawing happens inside IconVectors, the result is immediately editable with the normal tools, panels, and undo stack.
Using IconVectors MCP commands, create a new 24x24 document named "copy icon".
Draw a minimal UI-style "copy" icon with two overlapping document outlines.
Create each document outline as a separate element.
Use line style only, no fill.
Use a 2px stroke.
Use round line caps and round line joins.
Round the corners with IconVectors' built-in corner-rounding functions instead of approximating them with many extra points.
Keep the icon pixel-aligned and center the final composition on the canvas.
This prompt does more than describe the subject. It also constrains how the icon is built:
- 24px keeps the icon on a standard UI grid.
- separate elements means you can retouch the front and back sheets independently afterward.
- line style only keeps the icon readable as a UI outline symbol.
- 2px stroke gives the result a stable visual weight at 24px.
- built-in corner rounding avoids sloppy curve approximations and keeps the geometry cleaner for later edits.
After a short period of AI generation, here is the resulting AI-generated icon. It respects exactly the prompt specifications but requires retouching in IconVectors to get the perfect result for a user interface icon:
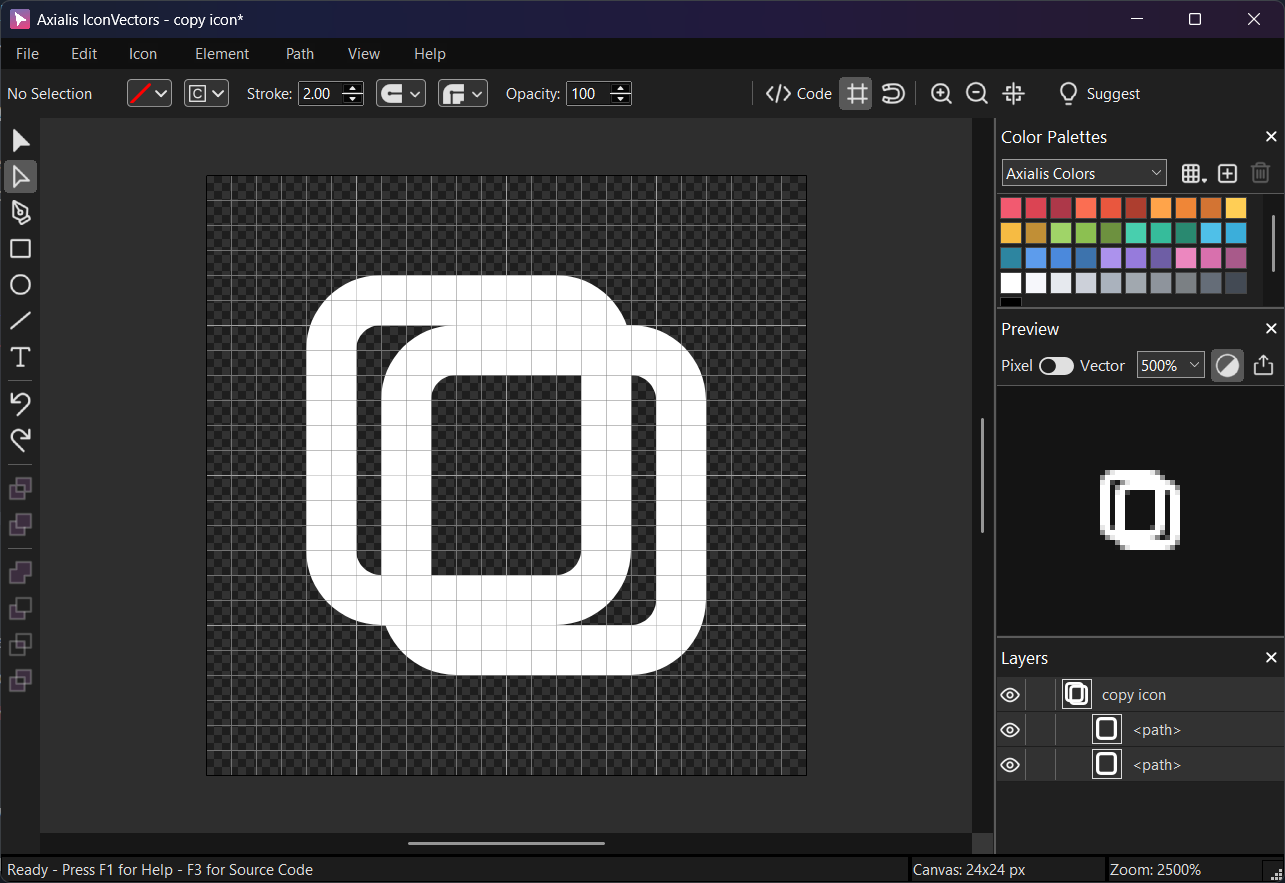
Step 2 - Retouch the icon in IconVectors
At this point the icon already exists in the current IconVectors document, so the next step is not import - it is refinement. Open the live Source Code Viewer with View -> Source Code (F3) and keep it visible while you edit. Developers usually want to see both the geometry and the resulting SVG structure at the same time.
Now refine the generated icon the same way you would retouch any hand-drawn document:
- Inspect the structure first - use the Layers list to make sure the AI really created the two document outlines as separate elements. If the structure needs cleanup, reorganize it with Element -> Group (Ctrl+G) or Element -> Ungroup (Shift+Ctrl+G).
- Move complete shapes into place - activate the Selection Tool (V), turn on View -> Snap to Grid (Shift+Ctrl+R), then nudge the front and back sheets until the overlap feels balanced. Use the arrow keys for fine movement and Shift+Arrow for 1px moves.
- Edit the path geometry - if the outlines need node-level retouching, convert them with Path -> Convert to Path (Ctrl+B), then switch to the Path Edition Tool. Click anchor points directly, or drag a box to select several points at once.
- Move the anchor points precisely - in the Path Edition Tool, drag points with the mouse or use the keyboard: Arrow Keys move by 0.1px and Shift+Arrow Keys move by 1px. This is the cleanest way to retouch the outer corners or adjust the sheet overlap without redrawing the icon.
- Fix corner quality - if one of the rounded corners feels too sharp or too soft, use the Path Edition Tool's corner-rounding handle on the converted path. That keeps the curve consistent with the built-in rounding model instead of hand-placing extra nodes.
- Normalize the stroke - select the outline elements and adjust their stroke in the Control Bar so both sheets share the same visual weight.
- Place the composition nicely - once the two sheets look right relative to each other, use Element -> Align if you need shared edges, then finish with Element -> Center -> Center Both (Alt+X) to center the icon on the canvas.
For a copy icon specifically, the important visual relationship is the offset between the back sheet and the front sheet. Retouch that relationship before you worry about export. When the overlap is clean and the corner radii feel consistent, the icon will read correctly at small sizes.
A good cleanup pass after MCP generation usually looks like this:
- Check that the icon fits the intended canvas size and visual weight.
- Confirm that the sheets are separate elements and easy to retouch.
- Normalize stroke widths so all outline segments feel consistent.
- Move the paths and anchor points until the overlap looks intentional.
- Re-center and align the geometry to the grid.
- Convert only the elements that truly need node editing.
- Keep the document readable in the Layers list so future edits stay cheap.
Step 3 - Export for the project
Once the icon is clean, export the asset in the form your project actually consumes:
- SVG master - keep an editable source file with File -> Save As... (Shift+Ctrl+S).
- Minified SVG delivery asset - export a production-friendly SVG with File -> Export -> Export Minified (Shift+Ctrl+M).
- PNG - rasterize to a single bitmap with File -> Export -> Export to Bitmap (Ctrl+F3).
- Icon set / multi-size output - export several bitmap sizes in one pass with File -> Export -> Export to Multiple Bitmaps (Shift+Ctrl+F3). This is the practical route when you need several PNG targets for app packaging or platform asset pipelines.
If your project consumes generated code rather than raw SVG files, keep the Source Code Viewer (F3) open. IconVectors can expose the same drawing as SVG, Minified SVG, SVG Symbol, XAML, WPF Geometry, VectorDrawable, SwiftUI, VueTS, ReactTS, and C++.
Why this workflow is better than AI-only SVG generation
- AI is fast at ideation - it gets you a first draft quickly.
- MCP keeps the draft inside the real editor - the AI creates actual document elements instead of detached SVG text.
- IconVectors is better at finishing - you get precise path editing, grid alignment, better structure, and predictable exports.
- The result stays maintainable - future designers or developers can reopen the master SVG and keep editing instead of starting over.
Related guides
- Clean Up AI-Generated SVG Icons
- Analyze and Clean Up SVG Icons
- Generate & Optimize SVG Icons with AI
- Using IconVectors with Claude
Start Making SVG Icons Today with IconVectors
Download the fully-functional 30‑Day Free Trial and unlock your icon design workflow.
Version 1.70 for Windows and macOS